Odoo is one of the most popular ERP software. Odoo has many features that are very complete and can be used for various business needs. Odoo is used by companies of all sizes to manage business processes, including: Sales, Accounting, Operations, Manufacturing, and Human Resources.
Laravel is a very popular PHP framework. Laravel is very powerful and easy to use to create various types of web applications. Laravel has many very complete features, one of which is the authentication feature. With this authentication feature, we can create web applications that require a login and password to access them.
In this article, we will discuss how to integrate Odoo with Laravel as an SSO server.
What is SSO (Single Sign On)?
SSO (Single Sign On) is a feature that allows users to log in to multiple applications using only one login. With SSO, users only need to log in once to access multiple applications. This feature is very useful for users because they don’t need to remember multiple logins and passwords.
Why Integrate Odoo with Laravel as an SSO Server?
Integrating Odoo with Laravel as an SSO server has several advantages, including:
- Single Sign On: Users only need to log in once to access both Odoo and Laravel.
- Centralized User Management: User management is centralized in Laravel, so we only need to manage users in Laravel.
- User Data Synchronization: User data is synchronized between Odoo and Laravel, so we don’t need to manage user data in both applications.
Steps to Integrate Odoo with Laravel as an SSSO Server
To integrate Odoo with Laravel as an SSO server, we need to follow the following steps:
-
Create a New Laravel Application
Start by running the following command to create a new Laravel application:
1laravel new sso-serverIf you already have an existing Laravel application, skip this step and move to the next one.
-
Install the
Laravel PassportLibraryIn your newly created Laravel application, install the
Laravel Passportlibrary by running this command:1php artisan install:api --passportFor more detailed documentation on
Laravel Passport, you can visit https://laravel.com/docs/passport. -
Set Up User Authentication
If you’re working with a fresh Laravel installation, you’ll need to set up user authentication before using Laravel Passport as an SSO server. To make things easier, you can use
Laravel BreezeorLaravel Jetstream. You can find more detailed documentation forLaravel Breezehere and forLaravel Jetstreamhere. -
Configure Laravel Passport
After setting up user authentication, it’s time to configure
Laravel Passport. There’s not much you need to change becauseLaravel Passportalready provides almost everything you need for oAuth2.First, ensure that the
Usermodel in your Laravel app uses theHasApiTokenstrait. If it doesn’t, add it like so:1 2 3 4 5 6 7 8 9 10 11 12 13<?php namespace App\Models; use Illuminate\Database\Eloquent\Factories\HasFactory; use Illuminate\Foundation\Auth\User as Authenticatable; use Illuminate\Notifications\Notifiable; use Laravel\Passport\HasApiTokens; class User extends Authenticatable { use HasApiTokens, HasFactory, Notifiable; }Next, in the
config/auth.phpfile, make sure theapidriver is set topassport:1 2 3 4 5 6 7 8 9 10 11'guards' => [ 'web' => [ 'driver' => 'session', 'provider' => 'users', ], 'api' => [ 'driver' => 'passport', 'provider' => 'users', ], ], -
Routes for Fetching User Data
After successful installation, you will see a new route in the
routes/api.phpfile that points to/user. This route is used to retrieve data about the currently logged-in user and will be utilized by Odoo to get user information.You can customize this route according to your needs. It’s important to note that this route should return the
userdirectly, without being wrapped in another key:1 2 3Route::get('/user', function () { return request()->user(); })->middleware(['auth:api']);An example response from this route would look like this:
1 2 3 4 5 6 7 8{ "id": 1, "name": "John Doe", "email": "[email protected]", "email_verified_at": "2024-10-12T21:49:20+08:00", "created_at": "2024-10-12T21:49:20+08:00", "updated_at": "2024-10-12T21:49:20+08:00" } -
Update the AppServiceProvider
In the
app/Providers/AppServiceProvider.phpfile, add the following code to thebootmethod:1 2 3 4 5 6 7 8 9 10 11 12 13 14 15 16 17 18 19 20 21 22 23 24 25 26 27 28 29 30<?php namespace App\Providers; use Illuminate\Support\ServiceProvider; use Laravel\Passport\Passport; class AppServiceProvider extends ServiceProvider { /** * Register any application services. */ public function register(): void { // } /** * Bootstrap any application services. */ public function boot(): void { Passport::enableImplicitGrant(); Passport::tokensCan([ 'user' => 'Access your user information', ]); Passport::setDefaultScope(['user']); } }We add
Passport::enableImplicitGrant();to allow the application to use theImplicit Grantmethod to obtain authentication tokens. TheImplicit Grantis an OAuth2 method where the client can obtain a token without usingclient_idandclient_secret. This is because Odoo uses theimplicitgrant type to obtain authentication tokens. While Laravel Passport doesn’t recommend usingImplicit Grantfor security reasons, it’s necessary for integration with Odoo.Additionally, we define the
scopethat the client app will use to obtain authentication tokens. In the example above, we define theuserscope to access the logged-in user’s information. We also set a defaultscopeto be used if the client does not specify one. -
Create a New Client
Finally, to configure Laravel, we need to create a new client. A client is an application that will use
Laravel Passportas the SSO server. To create a new client, run the following command:1php artisan passport:clientProvide the client name and callback URL as required. For the callback URL in Odoo, use
{base_url_odoo}/auth_oauth/signin. After that, you’ll get aclient_idandclient_secret, which will be used by the client app to get authentication tokens. Make sure to note these down.Now that you have the
client_idandclient_secret, you need to configure Odoo to useLaravel Passportas the SSO server.
After finishing the Laravel configuration, you’ll need to configure Odoo to use Laravel Passport as the SSO server.
-
Open the Odoo app and log in as an admin.
-
In the
Settingsmenu, go toGeneral Settings. -
Enable
Developer Modeby clicking theActivate the developer modebutton at the bottom of the page.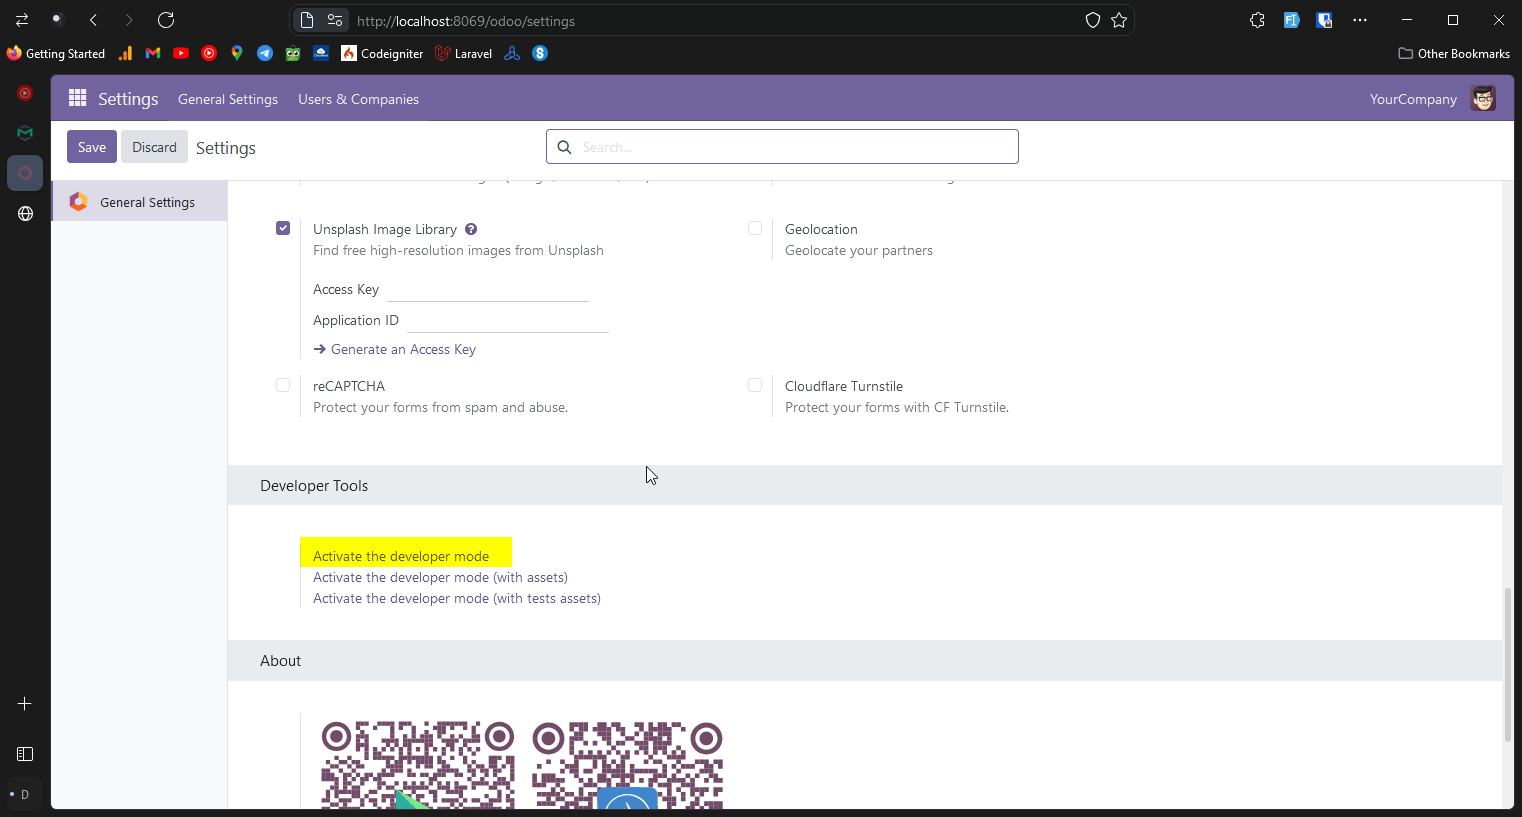
-
Once
Developer Modeis active, go toTechnical->System Parameters. -
Click the
Newbutton to create a new parameter. -
In the form, set the
Keytoauth_oauth.authorization_headerand theValueto1.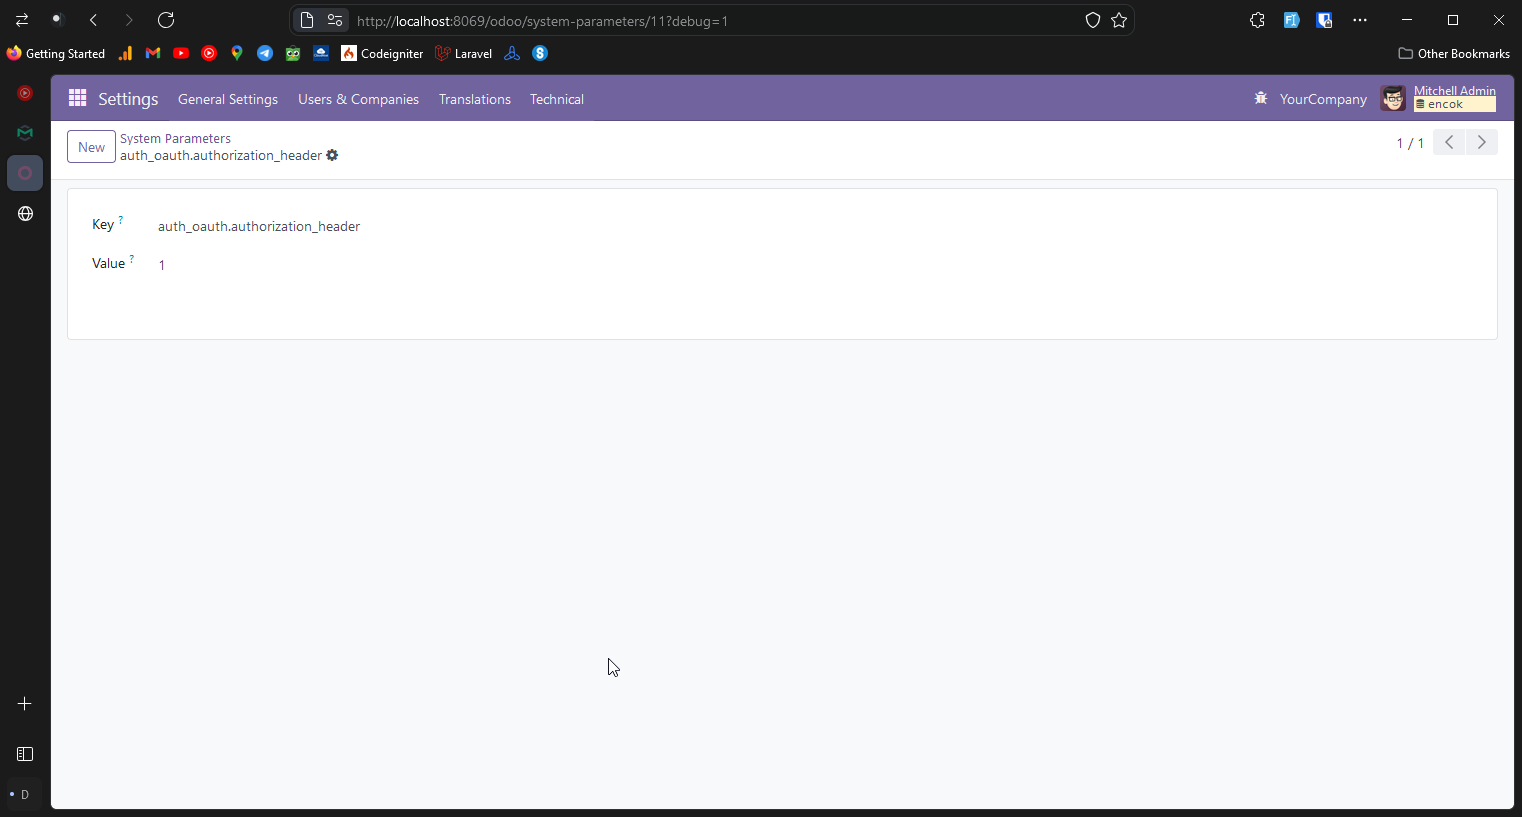
This parameter ensures that Odoo sends the authentication token in the request headers. Laravel requires a
Bearer Tokenin the request headers by default for user authentication. -
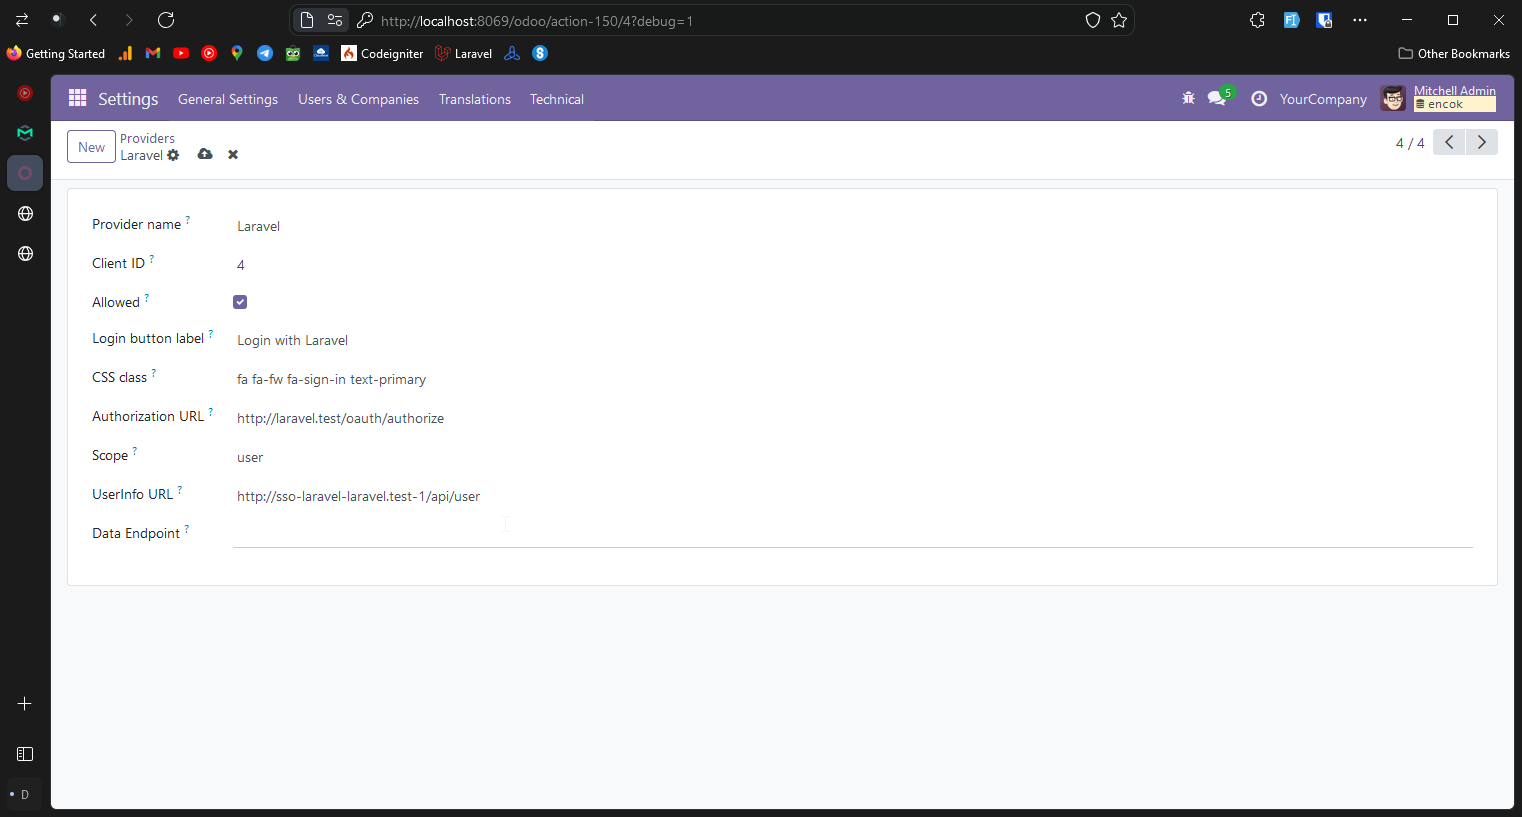
Configure the SSO Provider by enabling
OAuth AuthenticationunderSettings->General Settings.
Then, click on
OAuth Providersand clickCreateto add a new provider. -
Fill in the form with the following information:
Name: The provider name, e.g.,Laravel PassportClient ID: Theclient_idfrom the Laravel applicationAllowed: Check this boxAuthorization URL:{base_url_laravel}/oauth/authorizeUser Info URL:{base_url_laravel}/api/userScope:user
-
After creating the provider, to log in with SSO, create a new user in Odoo with the same email as the user in the Laravel app. This user will be able to log in to Odoo using SSO.
-
The newly created user will receive an invitation email. Click the link in the email, and on the registration page, choose
Sign in with SSOand select the previously created provider.
Note: Do not fill in a password on the registration form, as the user will log in with SSO. If a password is entered, the user will log in using that password instead. Select the
Login with SSOoption to ensure the user always logs in using SSO.

If a user previously logged in with a password but wants to switch to SSO, they will need to reset their password first. On the password reset page, select
Sign in with SSOand choose the SSO provider instead of entering a new password.
Conclusion
By integrating Odoo with Laravel as the SSO server, we can create a more secure and seamless experience for users. They only need to log in once and can access multiple applications without logging in again. With SSO, we can manage user access across applications and save users time.